

How To Build A King Size Headboard
Difficulty
Intermediate
| 
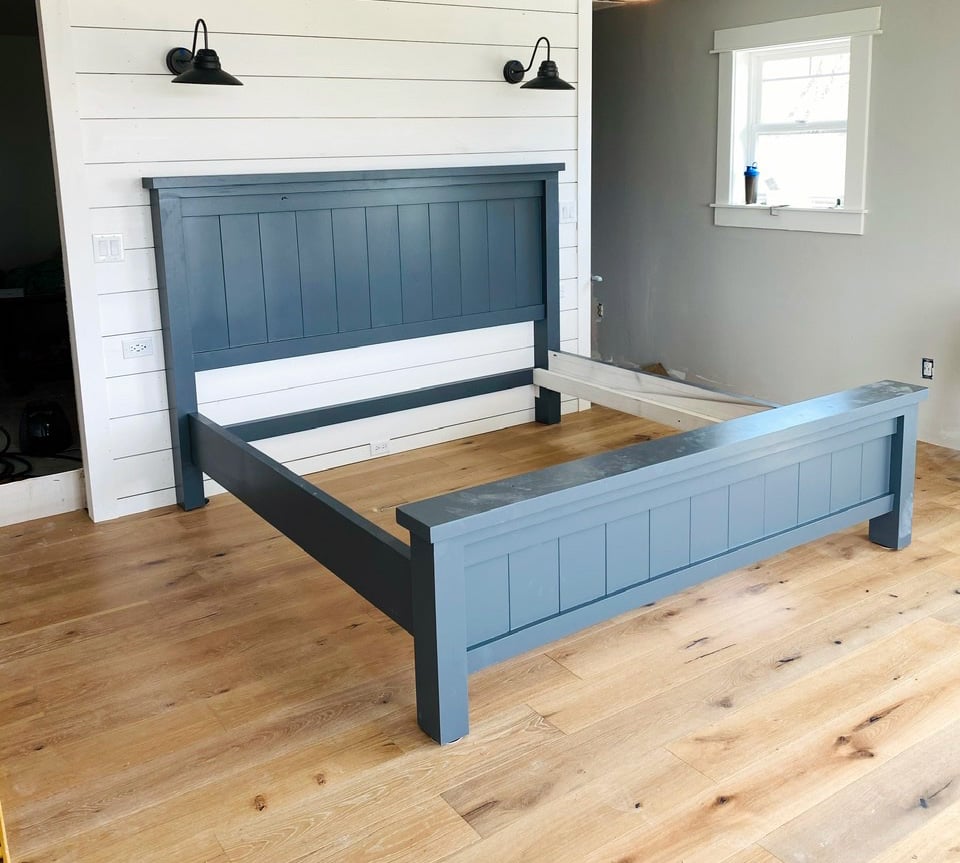
The very commencement real projection that I ever tackled all by myself was this Verbal Farmhouse Bed in King size.
I remember existence stunned at how well the project turned out. And here nosotros are, over a decade later, and information technology's all the same simply as beautiful, just equally sturdy, and I'yard just as stunned.
The farmhouse beds have been built thousands of times and is a reader favorite.
What Wood Practice You Use
We utilise standard off the shelf lumber to build - just framing lumber and common boards. You tin of course build with any type of forest, just brand sure your textile dimensions match dimensional lumber sizes (for example a 2x4 is actually 1-one/two" x iii-1/2").
Matching Nightstands
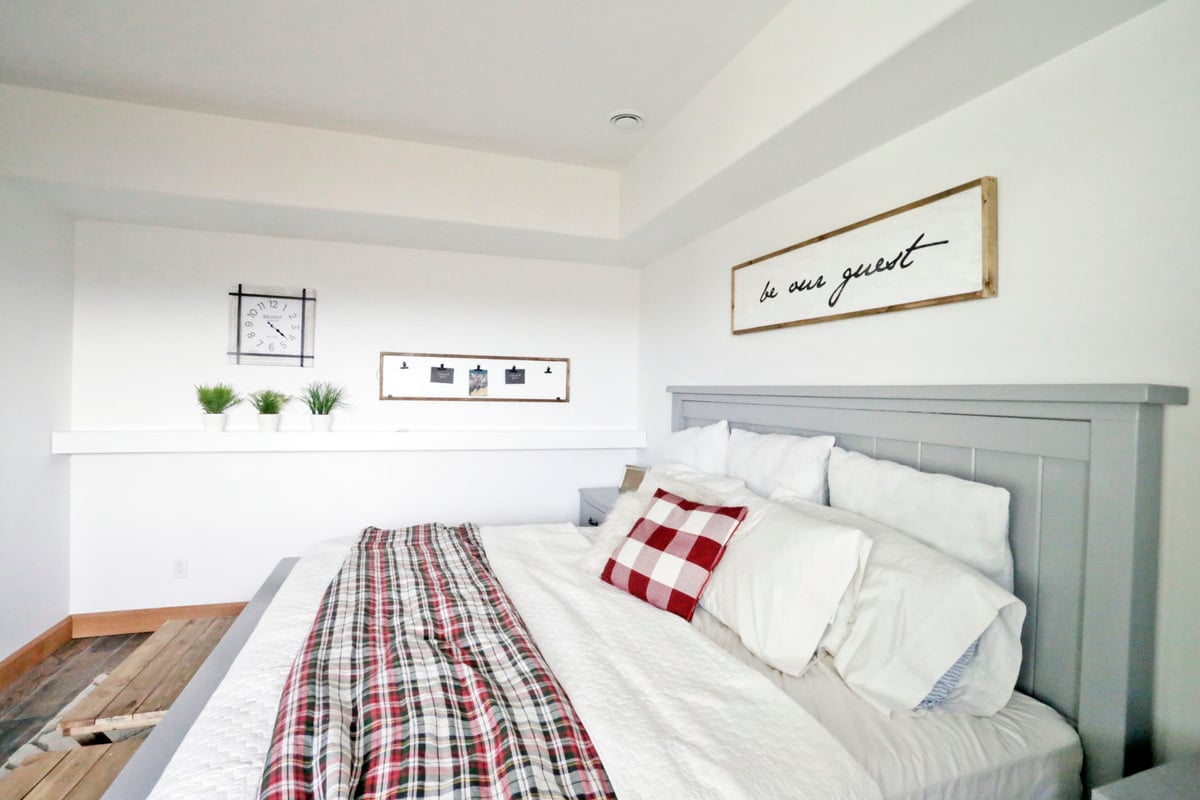
This bed is quite substantial and deserves matching nightstands. I have put together nightstand plans that are designed to match - so you can get a full bedchamber article of furniture set!

Updated Farmhouse King Bed Plans
We have updated these plans to be easier to build and not require pocket holes. You can still access the old plans hither.
If you need a dissimilar sized farmhouse bed, check out all our farmhouse bed plans here.
Pin For Later!
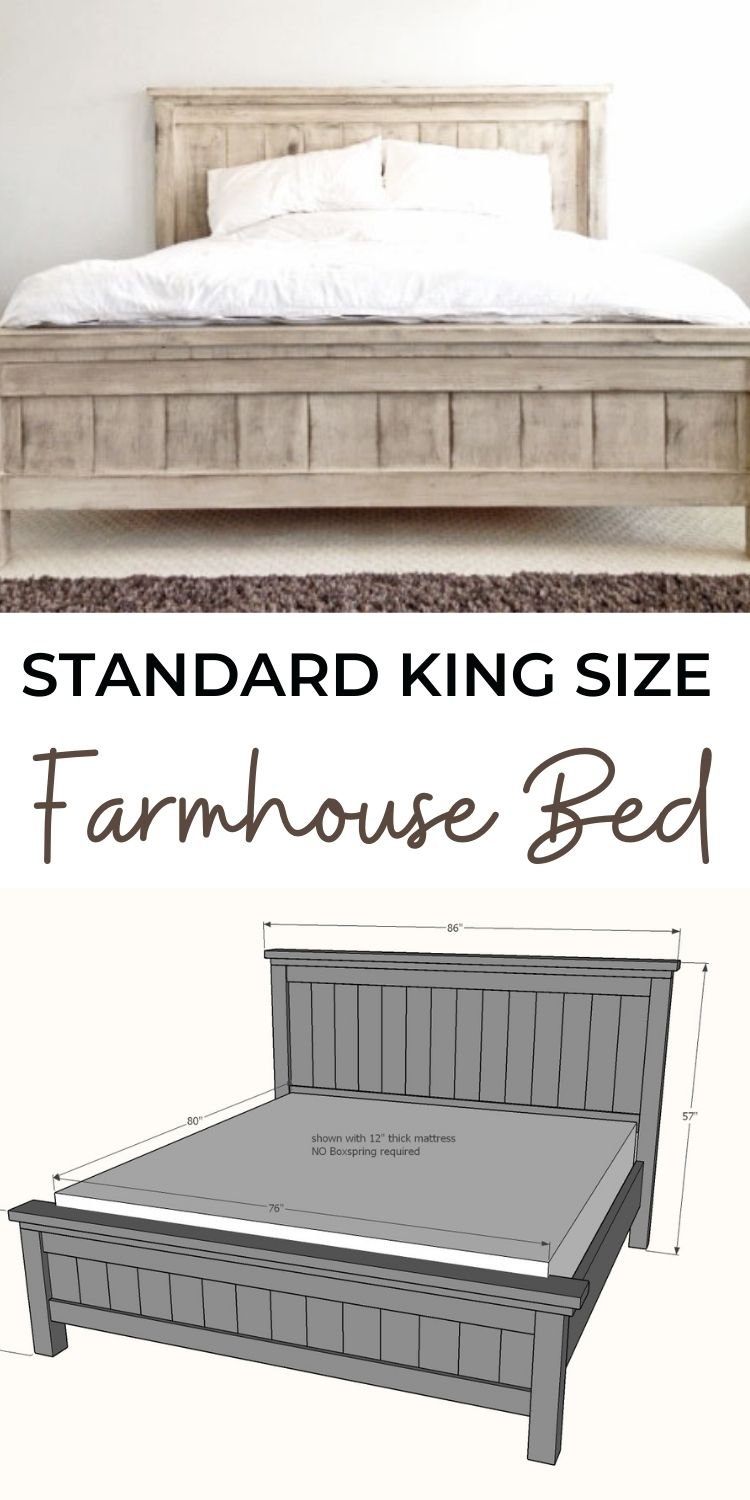
Dimensions
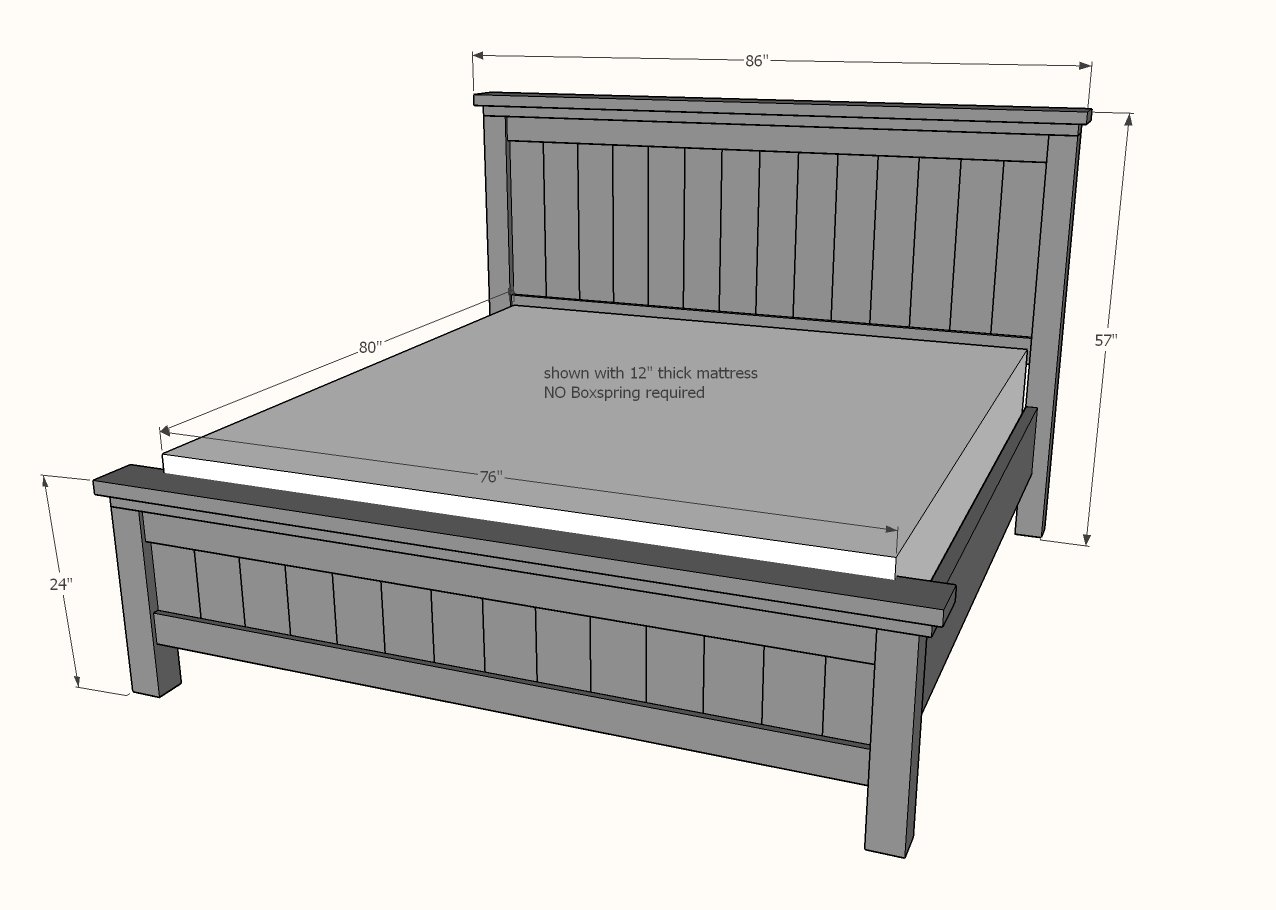
Designed to fit STANDARD rex approximately 76" ten 80
Training
Shopping List
2 - 4x4, viii feet long
1 - 2x2, eight feet long
7 - 1x6, 8 anxiety long
4 - 1x4, 8 feet long
ii - 2x6, eight feet long OR stud length
2 - 1x10 OR 2x10 @ eight anxiety long
18* - 2x4, viii anxiety long OR stud length
2 small-scale L brackets (1-1/two" wings)
2 directly brackets (vi" overall length)
150 - 1-1/iv" brad nails
150 - 2-1/2" self tapping wood screws (endeavour SPAX or like)
*Includes xi 2x4s for the mattress slats. You can substitute 1x4s, 1x3s, ripped plywood etc for the slats if you have other materials on mitt
Cut List
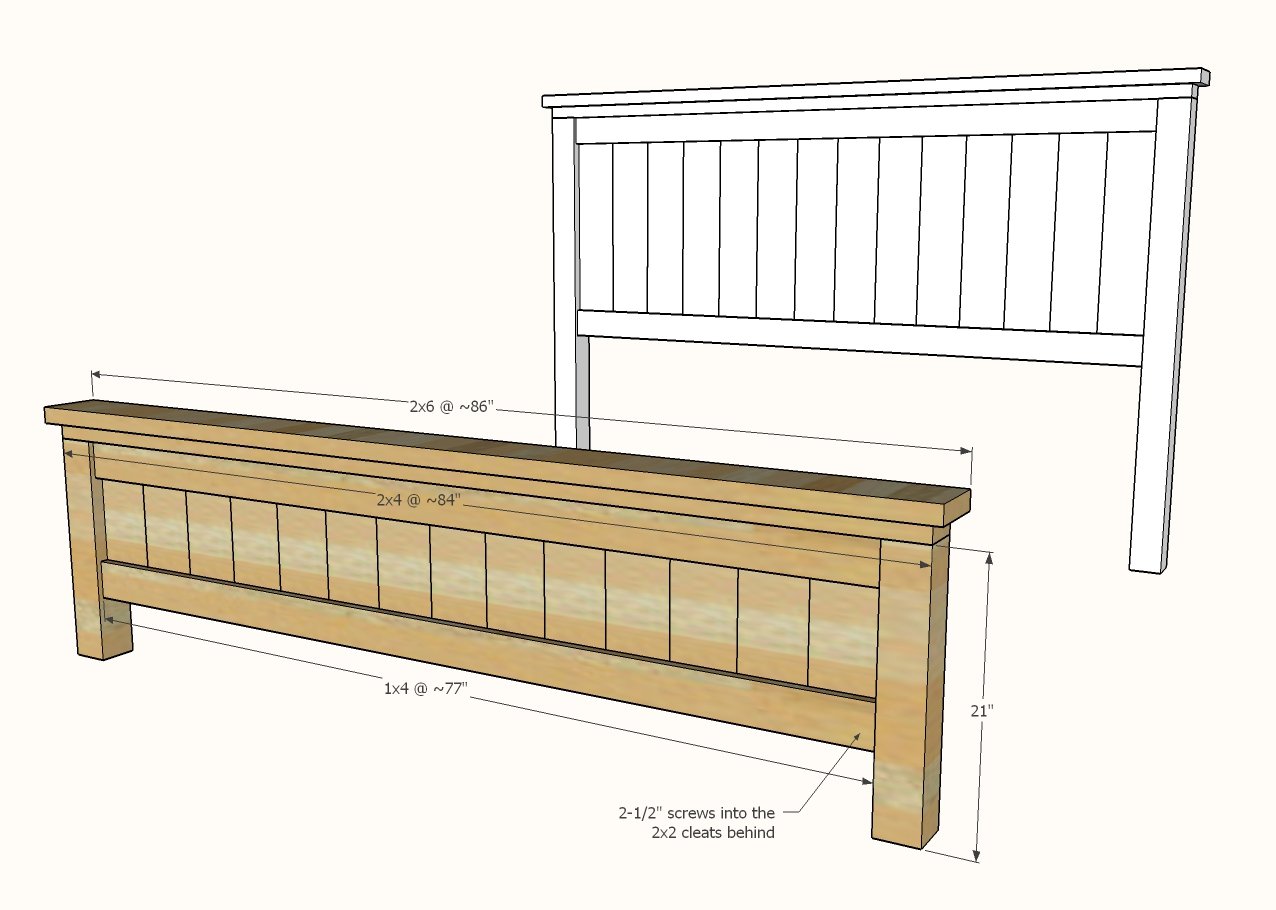
HEADBOARD Cut LIST
two - 4x4 @ 54" - headboard legs
ii - 2x2 @ 30" - headboard cleats
14 - 1x6 @ xxx" - headboard panel
ii - 1x4 @ about 77" - measure and cut to fit
1 - 2x4 @ about 84" - mensurate and cutting to fit
1 - 2x6 @ about 86" - measure and cut to fit
FOOTBOARD CUT List
2 - 4x4 @ 21" - footboard legs
2 - 2x2 @ eight" - footboard cleats
two - 2x2 @ 3" - footboard cleats
14 - 1x6 @ fifteen" - footboard console
2 - 1x4 @ most 77" - measure and cut to fit
1 - 2x4 @ about 84" - measure out and cutting to fit
1 - 2x6 @ about 86" - measure out and cut to fit
MATTRESS SUPPORT FRAME/SIDERAILS
iv - 2x4 @ 83-1/2" - mattress supports
ane - 2x4 @ ~77" - headboard tie in - cut to fit
4 - 2x4 @ 12-one/2" - heart legs
2 - 1x10 or 2x10 @ 80"
11 - 2x4 @ ~77" cutting to fit - mattress slats

Instructions
Step ane

Attach 2x2 cleats affluent to the back of the legs, with 2-1/ii" screws
Notation: Pocket hole users tin can skip this step
Footstep ii
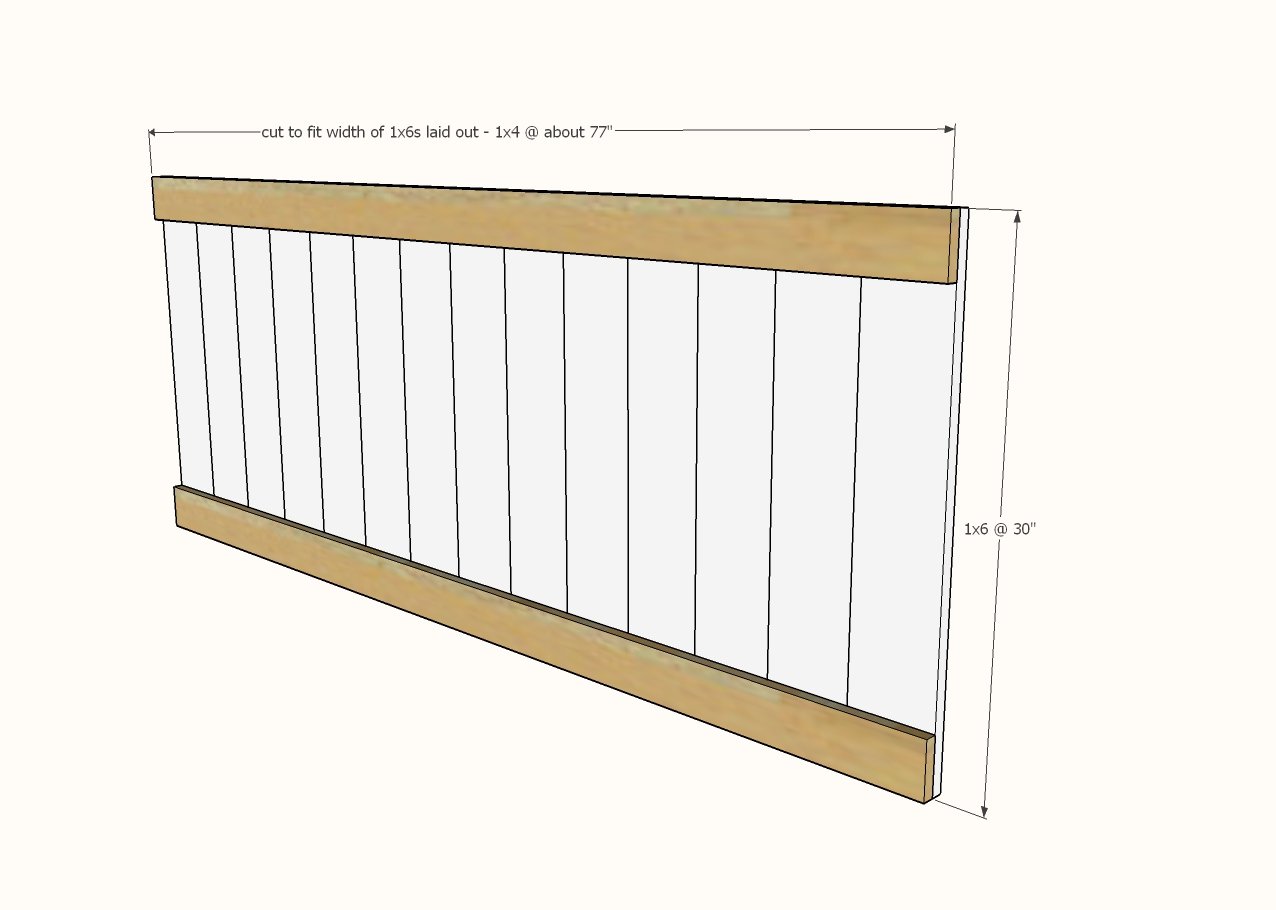
Layout the 1x6 headboard panels, and measure the overall width.
Cut 1x4 boards to this measurement.
Attach 1x6 boards to the 1x4s with glue and one-ane/4" brad nails from the back side to hibernate smash holes.
Make sure you apply mucilage between the 1x6 boards as you lot go.
Check to make certain that the panel is constructed square (NOT a parallelogram)
POCKET Hole USERS: Adhere 1x4s to the 4x4 legs with 3/4" pocket holes and 1-1/4" pocket hole screws. Then nail the 1x6s to the 1x4s inside the headboard panel.
Step 3
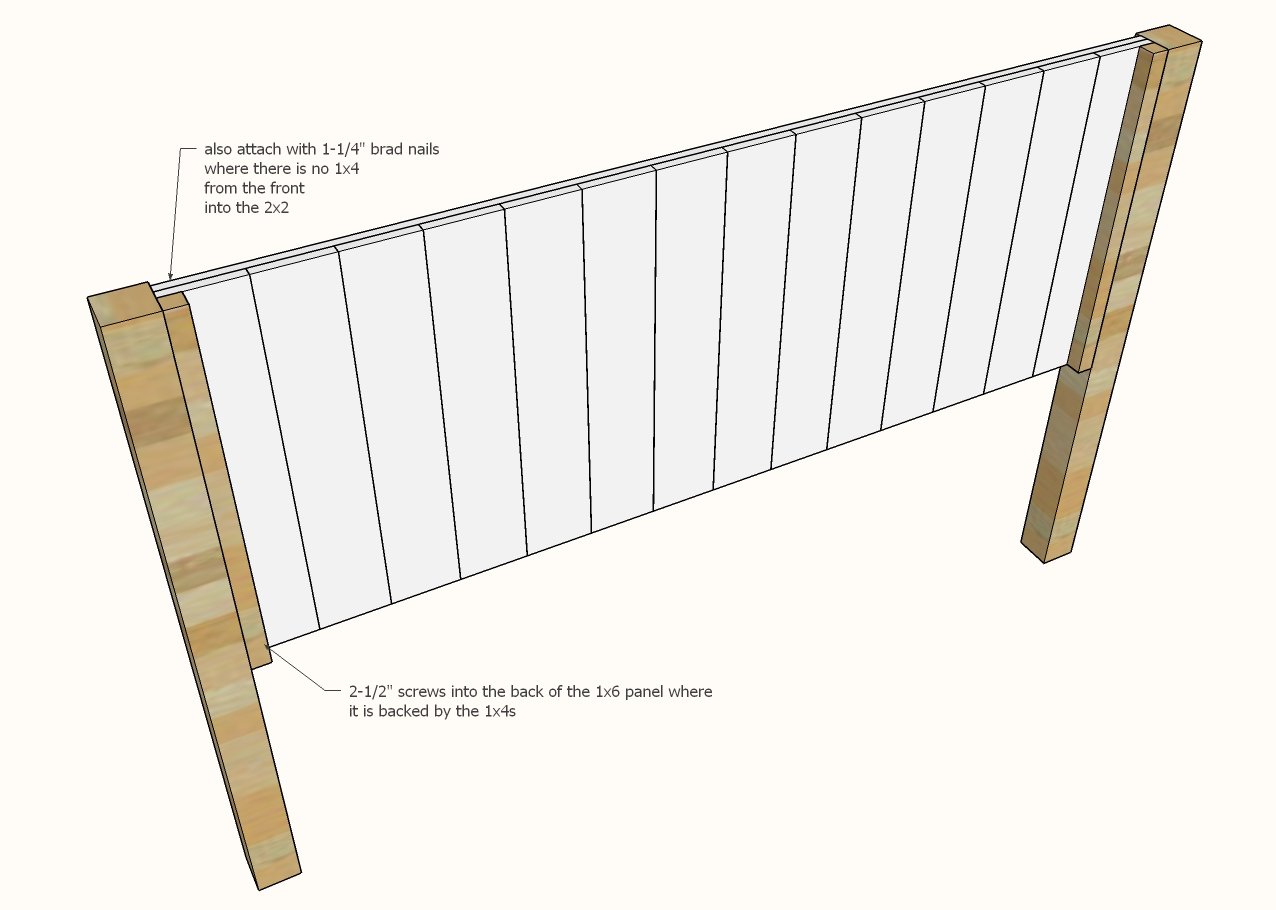
Attach panel to the 2x2 cleats with 2-1/ii" screws and glue. Too attach with a few ane-i/four" nails through front side into the 2x2 cleat where there is no 1x4.
POCKET HOLE USERS tin can skip this step
Step iv
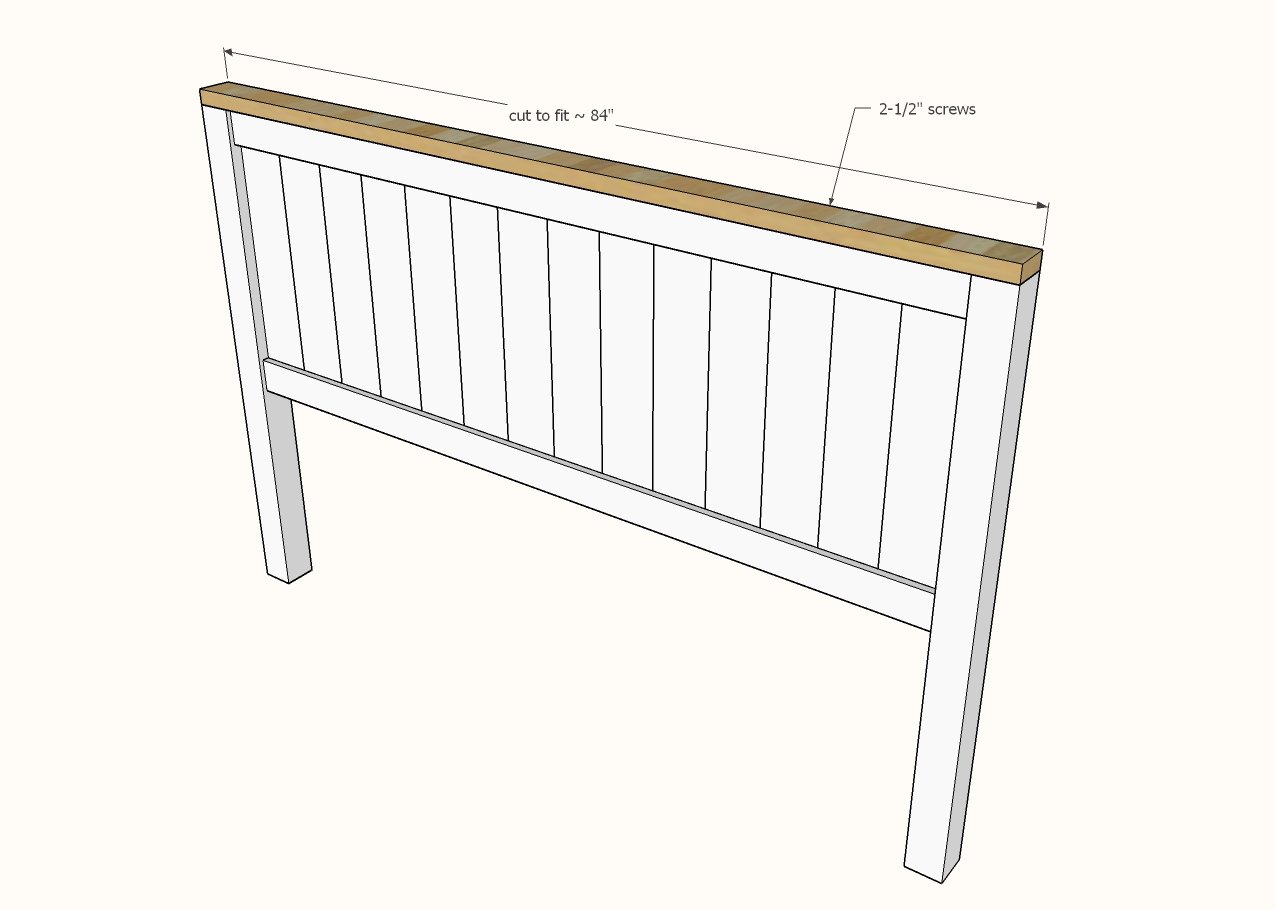
Measure out the tiptop overall width. Cut a 2x4 to this width. Attach with glue and screws to height of headboard.
Step 5
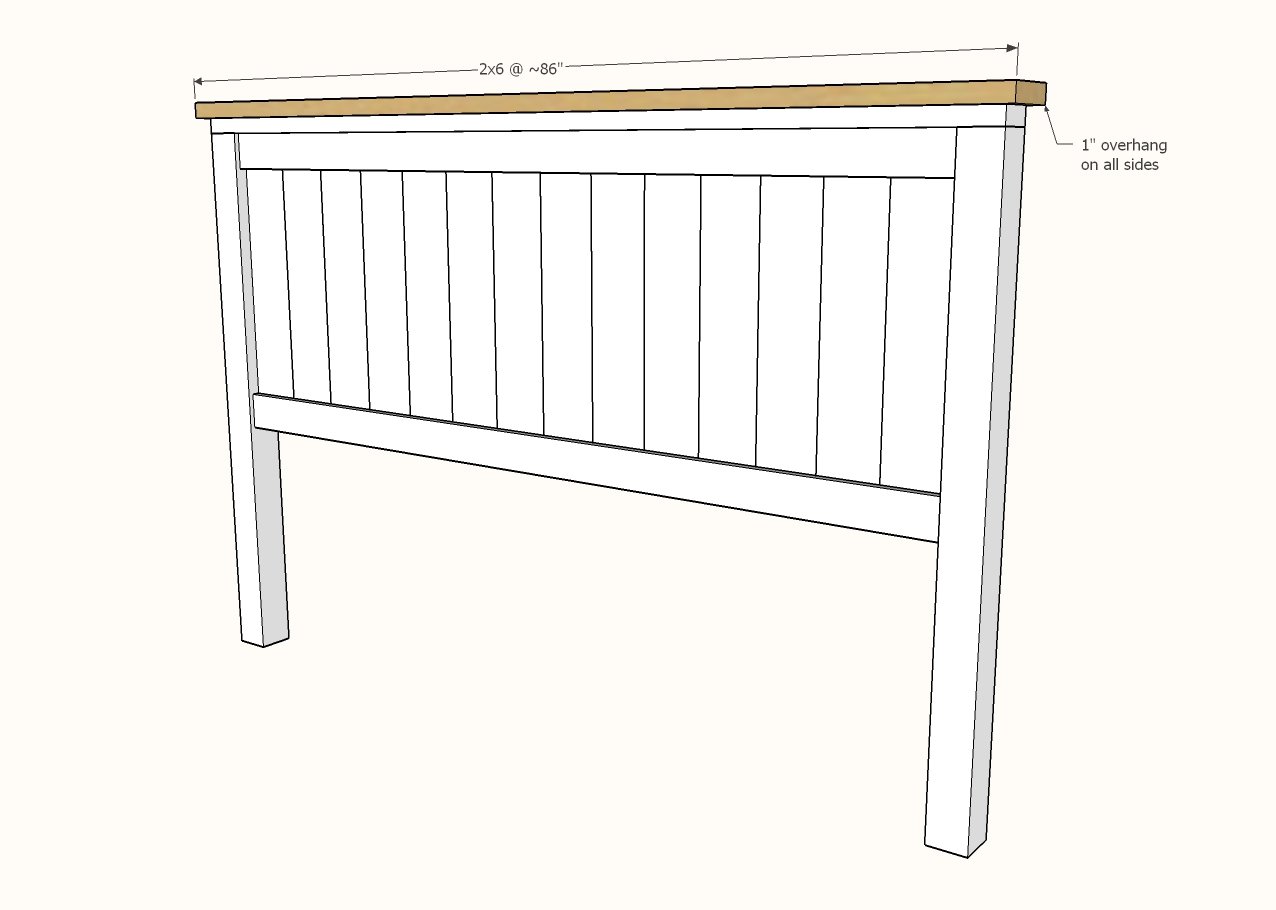
Cut a 2x6 ii" longer than the 2x4.
Attach with 1" overhang on all sides with two-1/2" screws and glue.
This completes the headboard build.
Pace six

The footboard is constructed the same equally the headboard, with the exception of the 2x2 cleats on the dorsum so that the siderail cleats can notch in.
If you have problem with your smaller 2x2 splitting effort predrilling holes.
Step 7
Finish structure of the footboard exactly equally you lot did the headboard.
Pace 8
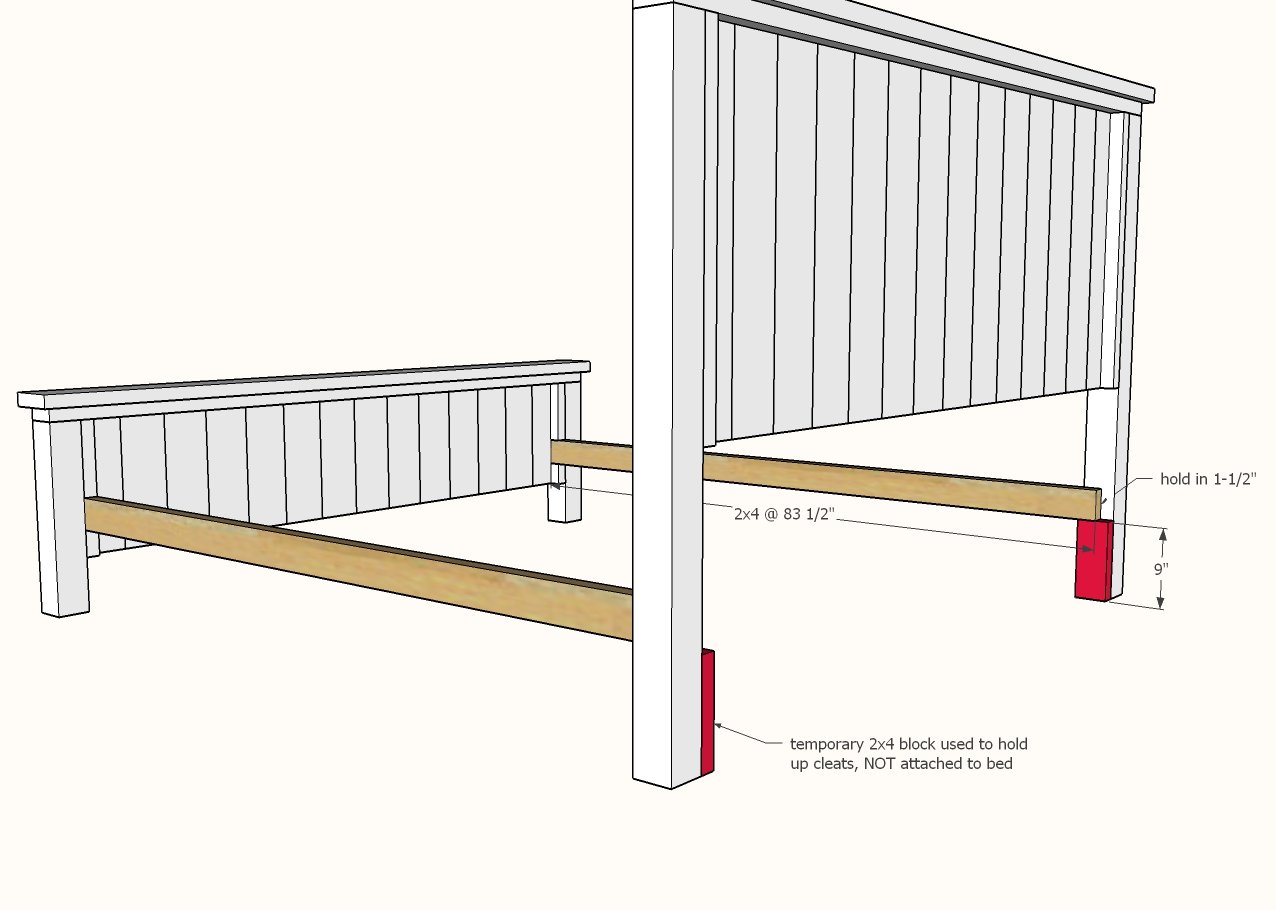
Attach siderail cleats inside the footboard and to the headboard legs. Use 2-i/2" screws to secure.
This completes the footboard.
Consider painting or staining your footboards and headboards and siderails now - and then movement all the pieces into the room for final assembly.
Step 9

Attach headboard support slice between the siderail cleats.
Step x

Build the middle legs - infinite the legs almost 1/three the style down - you don't have to be verbal here.
Step 11
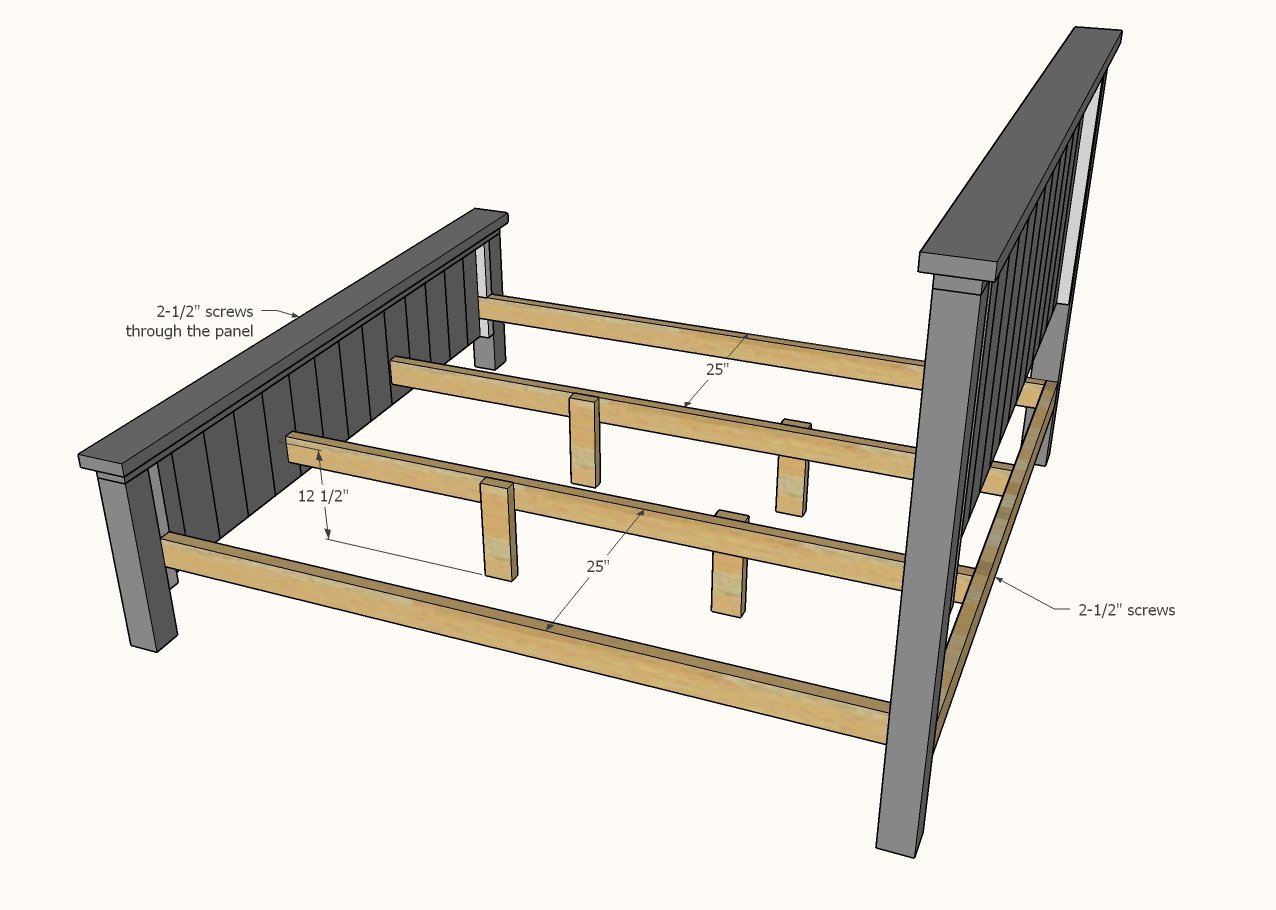
Attach the center legs inside the bed, splitting the spacing by about 1/three
Footstep 12

Attach siderails to the siderail cleats.
Nosotros recommend using brackets to attach siderails at the top to the headboard and footboard.
POCKET Pigsty USERS: Drill a pocket hole at the meridian and attach.
Step 13

Cut slats and lay about 4" autonomously in the bed.
Spiral down with ii-1/ii" screws.

How To Build A King Size Headboard,
Source: https://www.ana-white.com/woodworking-projects/farmhouse-bed-standard-king-size
Posted by: coreyittly1942.blogspot.com
0 Response to "How To Build A King Size Headboard"
Post a Comment